I am so excited to share an interview today that I got to do with Tori Toth, a New York City based home staging expert! I have always found the process of selling and buying a home fascinating.
When looking online you can usually tell which homes have been staged for sale and which haven’t. My first experience with a stager occurred 3+ years ago when we sold our condo.
My realtor felt so strongly that a stager was integral to the process of selling a home that she personally paid for a stager to come to everyone of her client’s homes before they put their home on the market.
I learned a lot from my stager about how to market my home to potential buyers and I’m excited to share Tori’s words of wisdom on the topic!
So let’s begin the Q&A!
Provident Home Design:
1. Of all the home improvement projects one can do (and there are a lot), when it comes time to sell which improvements make a house sell faster?
Tori:
I always find that home improvement projects that make the house sell fastest is when you paint, update the flooring, and replace light fixtures.
Paint can instantly update a tired old space and make it look, feel, and smell like new again – especially if the walls were covered in wallpaper.
The same goes for flooring, wood flooring that’s scratched can be refinished with a top coat for an instant shine and if you have outdated, stained carpet it’s best to get rid of it and replace with a more affordable material. For details on those check out this video:
Light fixtures are an easy way to tell if the home has been maintained throughout the years and can show the home’s actual age. So, if you have older fixtures, spend some money on replacing them.
Provident Home Design:
1b. Which DIY projects increase the home’s value the most?
Tori:
If you have some money to spend, I’d say make sure to update the kitchen, then the bath, and then curb appeal. The kitchen, as we know, is the heart of the home and it should feel light, bright and spacious with updated appliances and countertops. Most bathrooms get used and abused. They should look white glove clean, so replace old tile, vanities and tubs. Curb appeal and adding landscaping can give you a 215% return on your investment according to Homegains 2012 Top 1- DIY Home Improvements for Sellers. This is an important area because it’s the first thing buyers will see and sets the tone of what to expect inside.
Provident Home Design:
2. What are the best paint colors for selling a home? Do you have any go-to-favorites?
Tori:
It’s important to stick to neutral tones on your walls, unless you know your particular buyer will like a splash of color. You find this out by researching your neighborhood and putting together a buyer profile. Neutral tones are not just the “blah” real estate beige — here are some of my go-to colors:
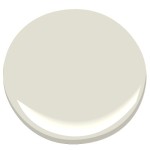
Halo, it’s from Benjamin Moore’s off white collection and it’s not only sophisticated but has endless possibilities when it comes to playing up other colors. This color is so versatile…
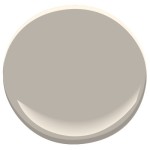
Benjamin Moore Silver Fox – it’s not really silver, but actually looks more like a gray-beige which is a good color combination to use in a room that you want to feel warm and cozy. When you put this color on your walls it’s almost as if you’re wrapping a blanket around you, so get comfy.
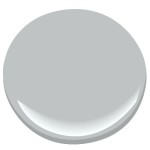
The next color is a blue gray and its called Eternity from Benjamin Moore. I absolutely love this color and I’ve recommended it at least a dozen times to use in bathrooms, bedrooms, and even family rooms. It’s in my bedroom now and it’s a great color because it changes depending on the light being reflected. It’s a great color for southern facing rooms.
Provident Home Design:
2b. I’ve always wondered, if you have a kid’s room painted in blue or pink or purple is that a turn off to potential buyers?
Tori:
Kids’ rooms are usually secondary rooms to be staged and don’t affect the sale as much so you can have colorful kids’ rooms — unless the color is making the space look smaller than it actually is. At the end of the day we want to showcase maximum square footage. If you have a darker color on the wall, make sure the furniture and accessories in the room are light and bright.
Provident Home Design:
3. In your book you touch on the emotional side of buying and selling a home. What are some of the simplest ways to elicit a positive emotional response from potential buyers?
Tori:
If you’ve researched your potential buyer, you’ll have a better idea of what they like, collect, and spend time doing. Once you know this you can use that to display moments in time that the buyer can emotionally connect to. So maybe it’s showcasing a place to entertain a sports fanatic in the basement or where you can spend time reading to a child.
Buyers like to envision themselves in the space and are really looking for how they’ll utilize it, so try to physically display these moments. Overall consider the buyer. Would the buyer want to step over your mess on the floor to see the bathroom? Or see your dirty dishes? Be considerate of their time and have clean, organized spaces that they can actually consider living in and that will instantly put them in a better mood as they tour your home.
Provident Home Design:
4. We all have our personal styles when decorating our home but are there certain styles of decorating that sell better?
Tori:
The design style of your home depends on the architectural style of the space, what you already have in the home, and what your buyer would like. It’s usually a combination of styles because you need to stay true to the home’s architectural style, but not all colonial homes need to be traditional. I would say the overall design style that sells better is transitional because it mixes the traditional with modern/contemporary style.
Provident Home Design:
5. You’ve mentioned curb appeal, how important is curb appeal? Do you have any tips for increasing curb appeal?
Tori:
First impressions can make or break a sale, and curb appeal is the first impression being made with the buyer so it is extremely important.
Curb Appeal
- Stay on top of your front landscaping, mow the lawn and trim bushes.
- Power wash the home and sidewalks.
- Add a welcome mat and potted plants around doorway.
- Paint your door to update the look of your home, update the hardware.
- Place a wreath or arrangement on your door.
- Remove all toys, figurines from the front yard.
- Clean all your windows.
- Update lighting and house numbers. Make sure they match.
- Repair the roof, gutters and update exterior paint if peeling.
Provident Home Design:
6. When you go to sell a home do things behind closed doors (like closets and cabinets) need to be staged?
Tori:
One of the first things buyers look for in a home is space, especially more storage space. It’s ideal to go through all your closets, kitchen cabinets or any cabinets that are provided in built-ins. Buyers are nosey and they want to know what they’re buying so focus on organizing and packing up items you won’t need while on the market.
Provident Home Design:
6b. What would you like people to know about the importance of staging a home?
Tori:
Today’s home buyers are looking for move-in ready homes and that’s what home staging does. It gets the home prepared for sale and the next homeowners. Home staging will help you stand out amongst your competition if you live in a competitive market. It also makes the home easier to market because it will provide amazing photos to show online, which is where most buyers go to search for their next home. Home staging can also get you more offers and can increase the price of the home or, at the very least, justify the price the home seller is looking for.
***************
A big thanks to, Tori, for letting me interview her and allowing me a sneak peek at her book coming out August 4th! If you have any interest on the topic of home staging and/or how to sell a house quickly then you will definitely enjoy her book! You can check it out
(affiliate link used for your convenience)!
If you know anyone getting ready to sell their home feel free to share this post with them!
The stager I used suggested having fresh yellow flowers in the home or on the porch because psychologically the color yellow indicates value or that you are getting a good deal. Our condo only had 5 showings before it sold, so who knows?
Til next time!mail Addres

 and a flat blade just like I would with wallpaper. The type of fabric you use will determine your cutting and trimming method. My fabric was woven so the loose threads kept unraveling which was a big problem. I found that if I waited until the starch was dry it was easier to cut a straight, unfrayed edge. If you use a regular printed cotton fabric, it won’t do this.
 it along the edge for a nice finishing touch. I used this to hide the staples on the fabric I upholstered to the wall but it would work on the starch as well.


