Mostrando entradas con la etiqueta DECORACION. Mostrar todas las entradas
Mostrando entradas con la etiqueta DECORACION. Mostrar todas las entradas
martes, 5 de enero de 2016

jueves, 31 de diciembre de 2015
Separar areas con countertop
DIY Loft Room Divider and Wardrobe

AT:LA reader Alex is the proud new occupant of a downtown Los Angeles loft. But although he liked the open space living, he was in need of some privacy and hidden storage for his bedroom. Check out the impressive IKEA hacked room divider and wardrobe he made using seven 8'x2' IKEA Numerar pre-cut counter tops in black brown for $10.00 a piece below...


A couple "before" photos

I found 7, 8ftx2ft Numerar pre-cut counter tops in black brown for $10.00 a piece. I stood 6 of them on
end and created a room divider and a wardrobe slot on the other. With the last one I added chrome legs and created a desk/sofa table.
end and created a room divider and a wardrobe slot on the other. With the last one I added chrome legs and created a desk/sofa table.

Lastly, I found some black/brown shelves in the as-is section and created a door for my wardrobe by connecting them longways and inserting aluminum strips at the seams.
I am really pleased with how everything has turned out so far (still need to finish the wardrobe and hang the door with barn door hardware) and wanted to share the project with you guys.

I'm also including a pic of the work in progress main wall that I just painted with chalkboard paint.
Everything is looking great Alex. We're sure to be bugging you for a House Tour when you're all ready and done with your new home. Thanks for sharing!
qqhqtqtqp://wqwqw.qqqapartmenttherapy.com/diy-loft-room-divider-and-ward-40352
Paneles Japoneses para cubrir closet
Before & After: Hiding the Great Wall of Clothes


Lack of closet space is an issue we must all confront at some point. Our apartment's previous tenants dealt with the bedroom's tiny closet by installing IKEA Stolmen shelves floor to ceiling across one entire wall and then graciously left them to us when they moved out. We were happy to inherit them and even happier to use them, however, having to stare at all of our clothes all the time was not so nice...
So, back to Ikea we went to find a simple solution to hide our Stolmen wardrobe. Wes had used a tension wire and fabric curtain combo in a previous apartment to hide an exposed closet, but it was much narrower and not as tall. Our 11.5' wardrobe wall also has a window in the middle which we did not want to block out. We decided on thetriple-rail Kvartal system with Anno Sanela flat panel curtains (in beige) to allow varied levels of access to our closet without losing any light.
The installation was actually very simple but did require 2 people. Also, the panel curtains are incredibly simple to measure and trim to the desired length with a regular X-acto knife. They were a bit squeaky so we greased the rail using bike grease on a Q-tip and now they slide with ease, without the noise. You'll notice there's a paint line behind the curtains because we painted after installing everything. We simply taped a line using a level and now it looks like we have a white built-in closet in our deep blue room.
qhqtqtqp://wwqw.qqqapartmenttherapy.com/how-to-hide-a-w-77879
viernes, 18 de diciembre de 2015
Lampara de exterior con luces navideñas
Create a DIY outdoor pendant with flower baskets and string lights.

CORTINAS PARA LA COCHERA
DIY OUTDOOR CANOPY CURTAINS
Outdoor canopy tent curtains are not only
beautiful, they serve much needed shade from the sun.
I found an inexpensive solution to our outdoor curtain needs...

Our deck can get very hot in the summer. The angle of
the sun makes it hard to sit under the canopy many times.

We needed curtains that could be drawn across to block the sun
or be tied back for a cozy feel.
Canopy curtains are quite expensive and if your canopy
wasn't fitted with curtain rods,
it makes hanging curtains very difficult.
After searching around for a while
I settled on a set of curtains from Ikea.
They are light weight, cotton, and best of all inexpensive.
The curtains come in a pack of 2 panels and for this project
I needed 2 packages.
I am not going all the way around my canopy because
2 sides of mine are against my house.

These are the Ikea curtains I used...

And these are the simple shower curtain rings I used to attach them to the canopy braces.

The top of these curtains not only have a rod pocket, it has
straps on the back you can thread the rod through.
I used these straps to hang the curtains.
They worked perfectly holding each ring onto the bar.

The shower curtain rings can be clipped or unclipped as necessary to move the curtain along the rod.

The curtains look beautiful tied around
the corners of the canopy and can be moved across to
block the sun or protection from a light rain.

At night the lights go on and it's a great place to hang out.

.JPG)


This is an easy and inexpensive solution that looks great!
jueves, 17 de diciembre de 2015


dulceros

The other day, I was sharing some craft ideas at a women's event, and while I was setting up for the event, I figured out how I could make a dollar store version of the large apothecary jars that are so popular in the big decorator catalogs. Previously, I've shared how to dollarstorecraft out of small lidded jars from the dollar store, but how can you make a large version if no larger lidded jars are sold at the dollar store? Simple, make your own lid!
I found a large apothecary jar at Ross Dress for Less for $13, which is a smokin' deal. But I made these large apothecary jars for a little less than $6 (not counting the E-6000 glue, which I had on hand). This apothecary jar is roughly the same size as Pottery Barn's medium Apothecary Jar which retails for $49.
You can use apothecary jars to hold just about anything! Place them in your bathroom to hold useful items like cotton swabs, extra soap, or washcloths. Use them around your home to hold decorative items (as shown here, Christmas ornaments and vase filler). Check this post at Living With Lindsay for more great ideas: Ten Fantastic Fillers for Apothecary Ja livingwithlindsay

.
Project Estimate:
- Large vase, $1
- Large glass candlestick, $1
- Small glass bowl, 3 for $1
- Small cut glass drawer pulls, 2 for $6.77 (at W-M)
- E-6000 glue, on hand
Total: $5.71
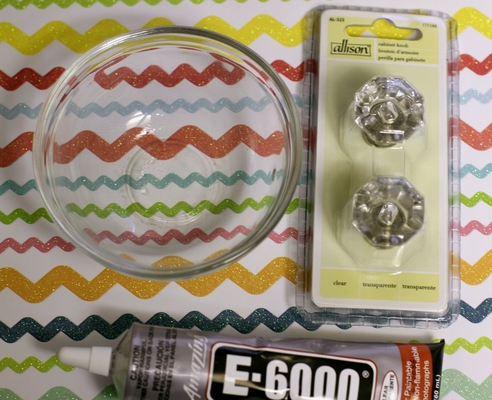
The secret to this project was a 3-pack of small glass bowls I found in the kitchen section at the dollar store. These glass bowls fit perfectly as lids on the top of the large glass vase from the dollar store. I just added a glass knob, and the apothecary jar lid was complete! I got the glass drawer pulls from the big blue store for about $6.77, or about $3.39 each. With some shopping around (at thrift or building thrift stores, garage sales, antique shops, etc.) , you might find a better deal on these knobs. I just wanted to get my project done as quick as I could so I could share it!

To Make:
1. Remove all price tags (I use Goo-Gone. Drip a bit of it on the tag, let it sit for a few minutes, and peel right off with no work). Clean all components with a damp paper towel and a bit of water, if needed. Let dry.
2. Glue large candlestick to vase with E-6000 glue.

3. Glue glass knob to bottom of small glass bowl with E-6000 glue.
4. Let everything dry and cure for 24 hours.
Depending on the fit of your lid on your vase, you might want to make another modification to the bowl. If the lid doesn't fit perfectly on your vase, put a small line of hot glue around the rim of the lid and let it dry. The dry glue will help correct the fit of the lid on the vase.
Suscribirse a:
Entradas (Atom)