
jueves, 17 de diciembre de 2015
Pared de diamantes con duct tape
No Paint Diamond Wall
I made one last tweak to our bedroom. The diamond wall…
I promise this is the last time I’ll show you this photo..at least for a long time because it doesn’t look quite like this anymore.
After two and one half hours and about $25 worth of duct tape we have a sassy walled room.
I wish I could say I had this grand idea to put tape on my walls from the beginning but what happened was more of a dare. Scotch Colors and Patterns Duct Tape challenged me to create a project and I tried four different ideas (a chair? a lampshade? planters? a vine?) until I was happy with the results. I LOVED this challenge it goes right with my whole Lovely Limitations Theory–limit what I can use, and I’ll be more creative (as long as I have time to think about it).
I wanted to come up with a project that looked good enough for people to actually want to do, was easy, and that the duct tape was a short cut, not whatever the opposite of short cut is (long cut?).
I also wish I could say that I was patient to a fault but that role in our family is played by my husband. And this project requires about an hour of steadfast patience. This man has a lifetime supply. I pretty much laid on the bed and talked incessantly while he worked.
But, I did let him take breaks.
I had this idea lingering in my head for a few years. I’ve watched people on blogs tape off stripes in a room so they could paint. It seemed painstakingly slow (remember, I have no patience for projects). And one project I remember the tape was nearly the same color as the paint and part of me thought it was sad that they couldn’t just leave the tape up and not paint. Dear Scotch Colors and Patterns Duct Tape, please consider creating 6 and 12 inch wide rolls of tape in a matte finish so I can finally have stripes on my walls.
We only did the main wall in the room. I’m usually not a fan of accent or “show off walls” but it works in here.
Supplies?
- 3-4 rolls of Scotch Colors and Patterns Duct Tape (I’m partial to the white–it’s a phase, but they have pink and turquoise plaid and paisley and everything in between).
- X acto knife
- measuring tape
- laser level or plumb line (we made our own with a string and something heavy tied to it)
- patience
Before we started I made a mock-up of how big I wanted the diamonds to be. Diamonds look their best when they are twice as high as they are wide. I figured a 30 inch tall diamond would be nice so, from the top center of the wall I made a mark on the wall (mark 1) measured down 30 inches and made a mark (mark 2). Then I measured down 15 inches into the center of where the diamond would be (halfway) and then 7.5 inches over to the right (mark 3) and 7.5 inches over to the left (mark 4). I was left with 4 marks on the wall that marked the points of the diamond.
I slapped some tape up just to get a feel for the size and yep, I liked it so I took it down and used those marks as our starting point. From there, we measured and marked 15 inches over and 30 inches up across the entire wall. And by “we” I mean my husband.
It took a few hours (but that includes a quick run to the store to get more tape) and the results were stunning. Here’s a little 3 minute video that documents most of the process.
dulceros
The other day, I was sharing some craft ideas at a women's event, and while I was setting up for the event, I figured out how I could make a dollar store version of the large apothecary jars that are so popular in the big decorator catalogs. Previously, I've shared how to dollarstorecraft out of small lidded jars from the dollar store, but how can you make a large version if no larger lidded jars are sold at the dollar store? Simple, make your own lid!
I found a large apothecary jar at Ross Dress for Less for $13, which is a smokin' deal. But I made these large apothecary jars for a little less than $6 (not counting the E-6000 glue, which I had on hand). This apothecary jar is roughly the same size as Pottery Barn's medium Apothecary Jar which retails for $49.
You can use apothecary jars to hold just about anything! Place them in your bathroom to hold useful items like cotton swabs, extra soap, or washcloths. Use them around your home to hold decorative items (as shown here, Christmas ornaments and vase filler). Check this post at Living With Lindsay for more great ideas: Ten Fantastic Fillers for Apothecary Ja livingwithlindsay
.
Project Estimate:
- Large vase, $1
- Large glass candlestick, $1
- Small glass bowl, 3 for $1
- Small cut glass drawer pulls, 2 for $6.77 (at W-M)
- E-6000 glue, on hand
Total: $5.71
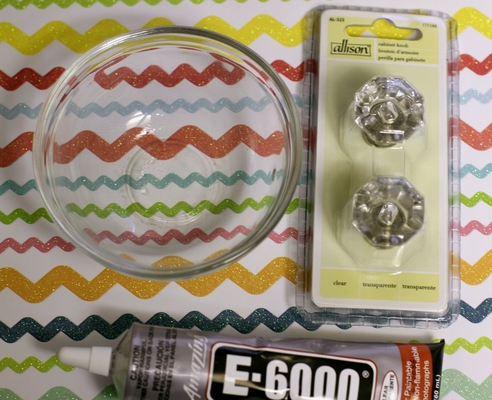
The secret to this project was a 3-pack of small glass bowls I found in the kitchen section at the dollar store. These glass bowls fit perfectly as lids on the top of the large glass vase from the dollar store. I just added a glass knob, and the apothecary jar lid was complete! I got the glass drawer pulls from the big blue store for about $6.77, or about $3.39 each. With some shopping around (at thrift or building thrift stores, garage sales, antique shops, etc.) , you might find a better deal on these knobs. I just wanted to get my project done as quick as I could so I could share it!
To Make:
1. Remove all price tags (I use Goo-Gone. Drip a bit of it on the tag, let it sit for a few minutes, and peel right off with no work). Clean all components with a damp paper towel and a bit of water, if needed. Let dry.
2. Glue large candlestick to vase with E-6000 glue.
3. Glue glass knob to bottom of small glass bowl with E-6000 glue.
4. Let everything dry and cure for 24 hours.
Depending on the fit of your lid on your vase, you might want to make another modification to the bowl. If the lid doesn't fit perfectly on your vase, put a small line of hot glue around the rim of the lid and let it dry. The dry glue will help correct the fit of the lid on the vase.
Suscribirse a:
Entradas (Atom)